Easter fingernail designs have a reputation problem. Search the term and you’ll find two camps: saccharine egg and bunny art that looks better in a kindergarten classroom than at brunch, and vague spring-pastel roundups that could apply to any week in April. Neither actually answers what most people are looking for.
What people want is a design that reads as Easter — seasonal, deliberate, spring-appropriate — without announcing itself from across the room. Something that photographs well, wears gracefully through the week, and doesn’t require a nail tech with a fine-art degree to execute.
The 25 designs below were chosen with that tension in mind. Some are purely about color and finish; others incorporate nail art that references Easter imagery without being costumed about it. All of them work on real hands, at real-world nail appointments, in 2026.
Glazed & Sheer Finishes
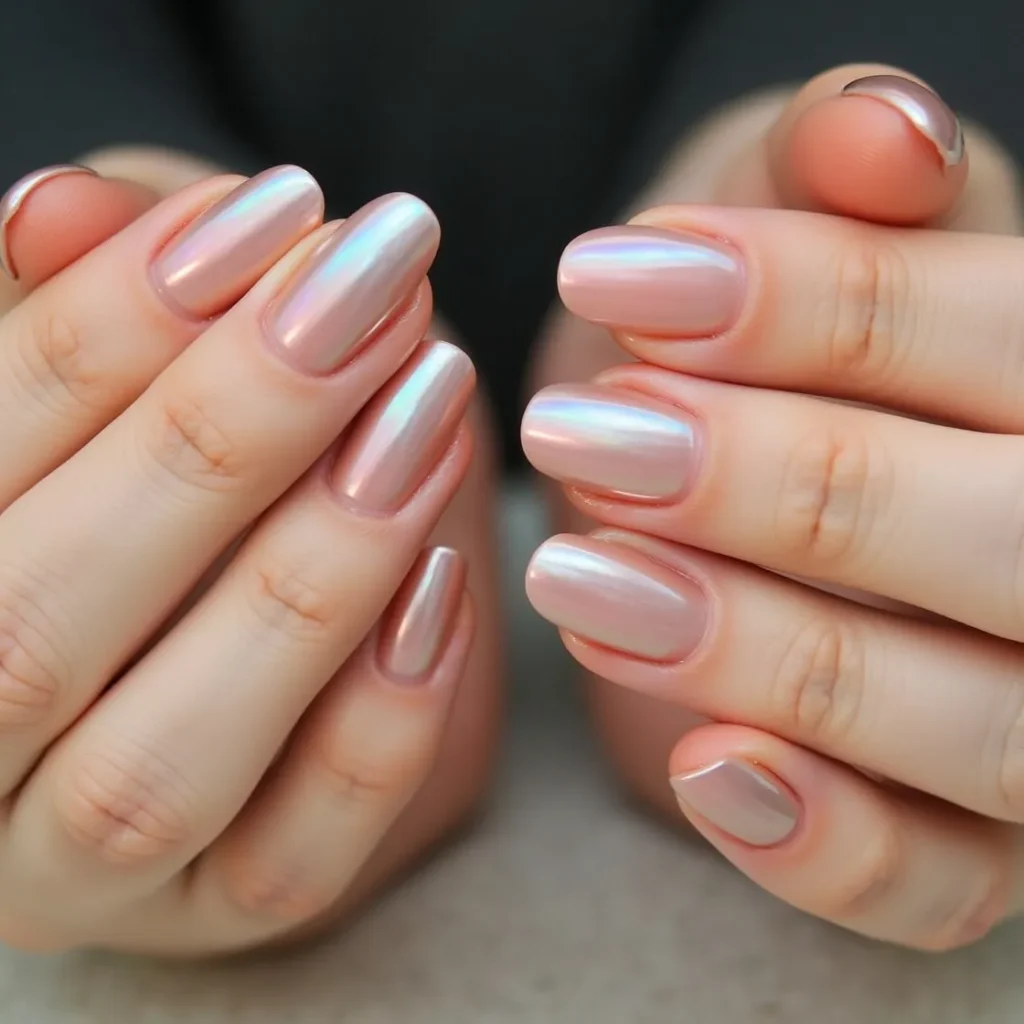
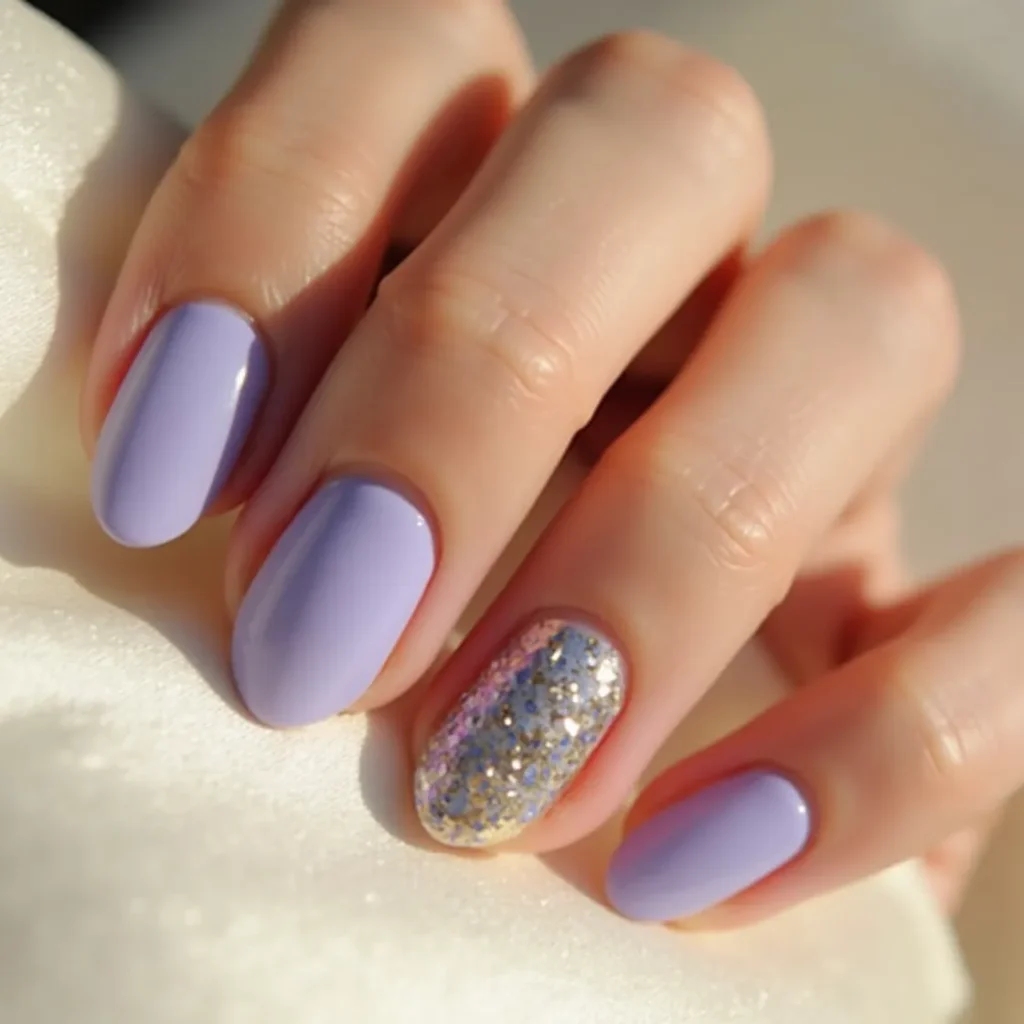
1. Sheer Lavender Glazed Nails
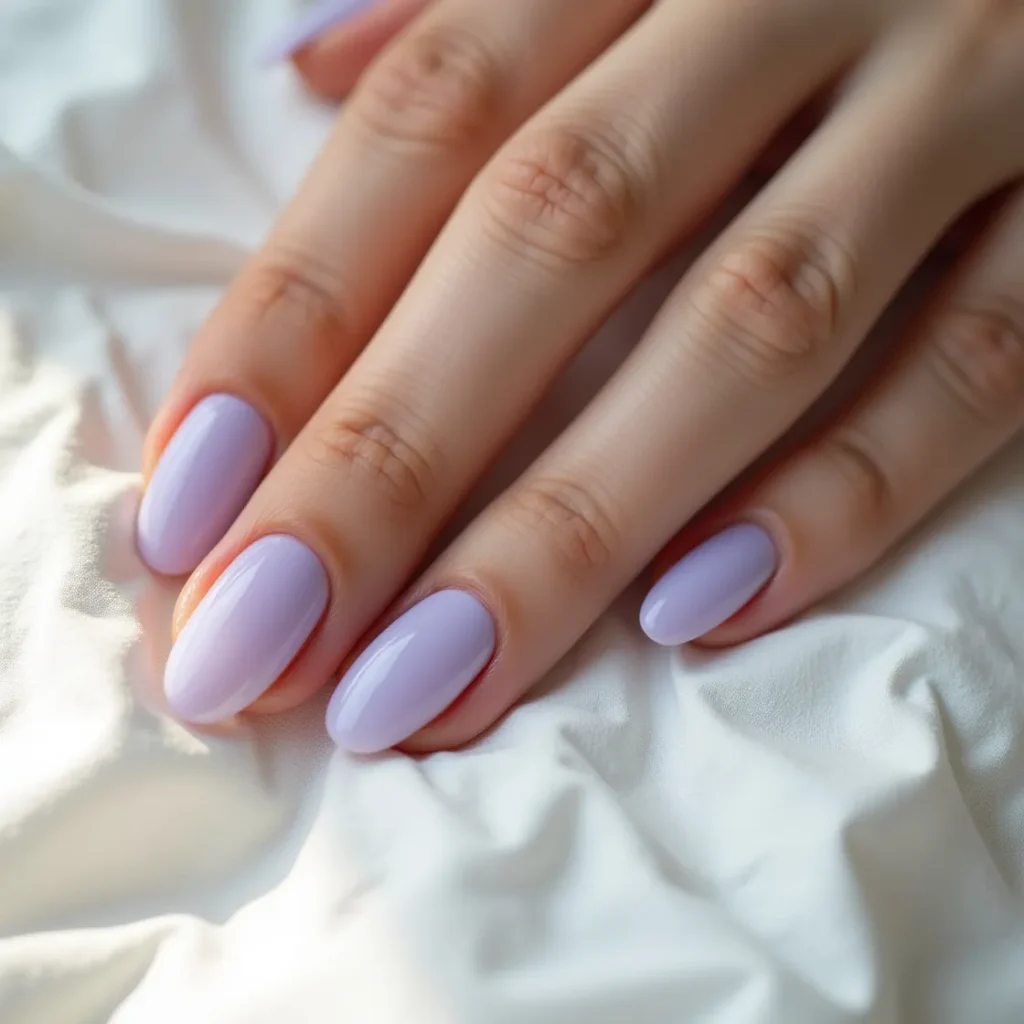
The single most-saved Easter fingernail design of spring 2026. Sheer lavender in a glazed finish catches spring light like frosted glass — the translucency creates depth that a standard opaque polish never achieves. Works across every nail shape, particularly strong on almond and oval. One of the few seasonal designs that photographs even better in natural outdoor light than under studio conditions.
DIY tip: Apply a sheer lavender base in two thin coats, then seal with a high-gloss gel topcoat. The gloss is what creates the glazed depth — don’t skip it.
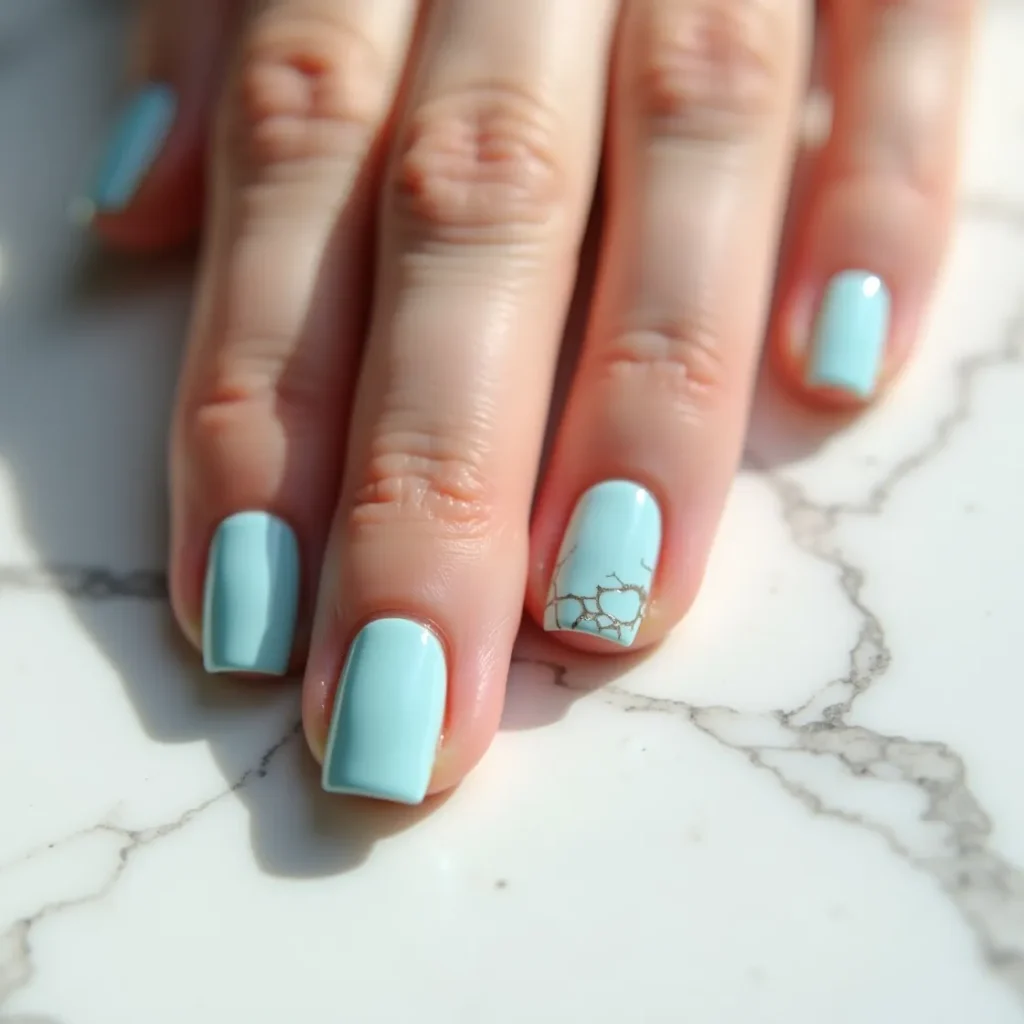
2. Robin’s Egg Blue Sheer Nails
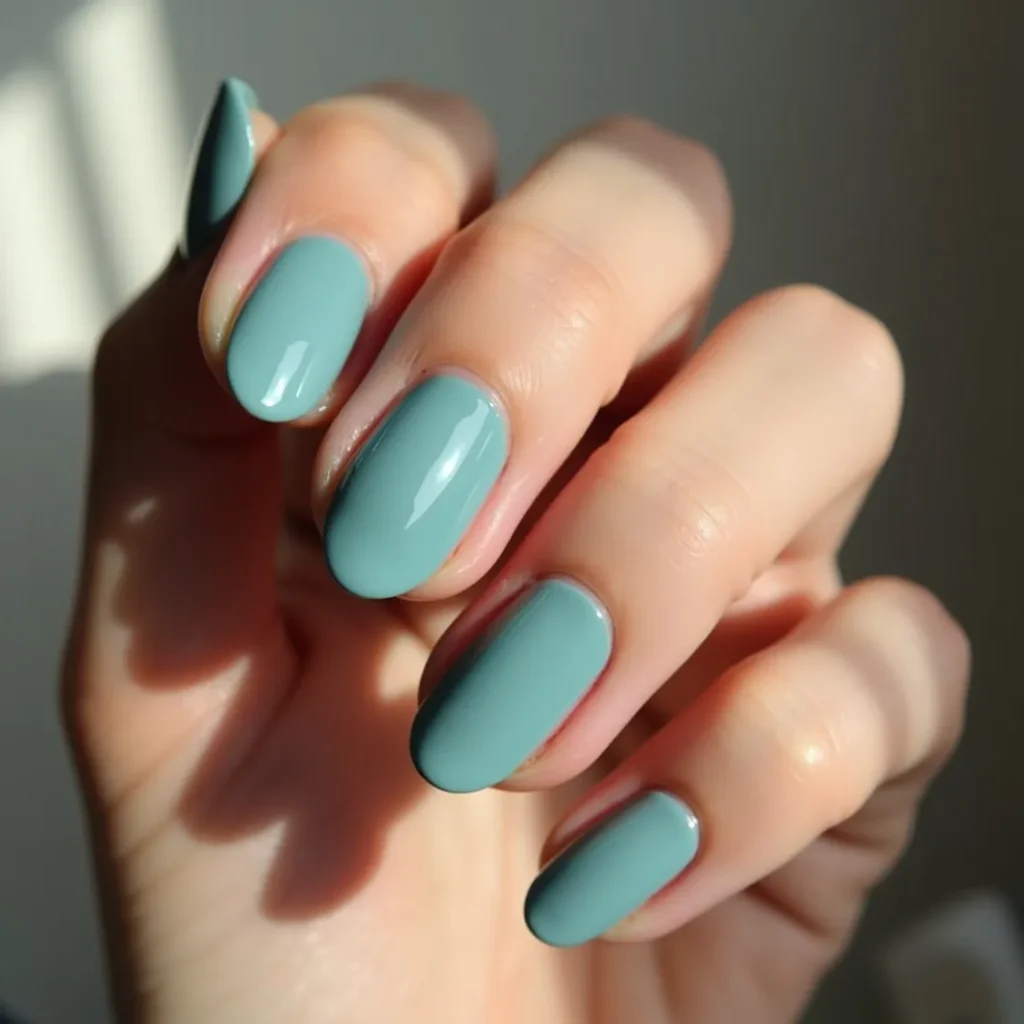
Robin’s egg blue has pulled ahead of the expected lavender-and-pink Easter defaults this season. In a glazed or sheer finish, the cool blue-green reads spring without reading costume. It pairs cleanly with white outfits and photographs particularly well in outdoor light. For fingernails specifically, the color is most effective on oval or rounded shapes where the curve softens the brightness.
DIY tip: Use a sheer or jelly-formula blue-green polish. Two coats keeps the translucency. Finish with a glossy topcoat for the glazed effect.
3. Butter Yellow Satin Nails
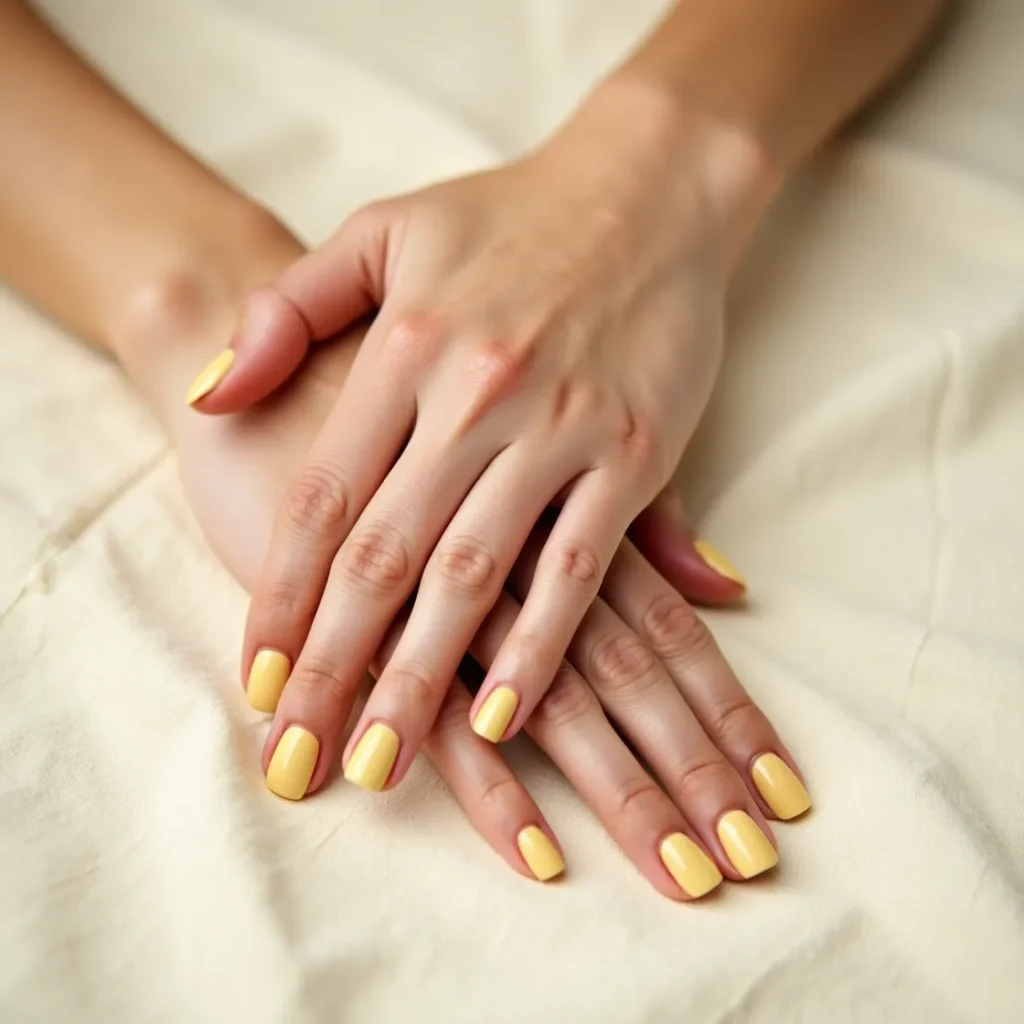
Warm butter yellow in a satin finish — not matte, not glossy, but the exact midpoint between them — on medium length nails. The texture catches diffused light in a way that reads expensive without requiring any art. The yellow flatters a wide range of skin tones and transitions cleanly from Easter Sunday through May. A strong choice for anyone who wants color without nail art.
DIY tip: Apply butter yellow polish in two coats, then use a satin topcoat instead of a glossy one. Satin topcoats are widely available and the finish difference is immediately noticeable.
4. Pastel Peach Chrome Nails
Sheer pastel peach with a subtle chrome or pearlescent finish. The chrome shifts the base color from flat to luminous — warm peach in direct light, slightly silver-pink in shadow. On fingernails the effect is most visible on oval and coffin shapes where the light catches the curve. One of the more distinctive options in this season’s Easter nail palette.
DIY tip: Apply a sheer peach base, cure under UV if using gel, then buff chrome powder over the surface using a sponge applicator. Finish with a gel topcoat to lock the chrome in place.
5. Milky White Glazed Nails
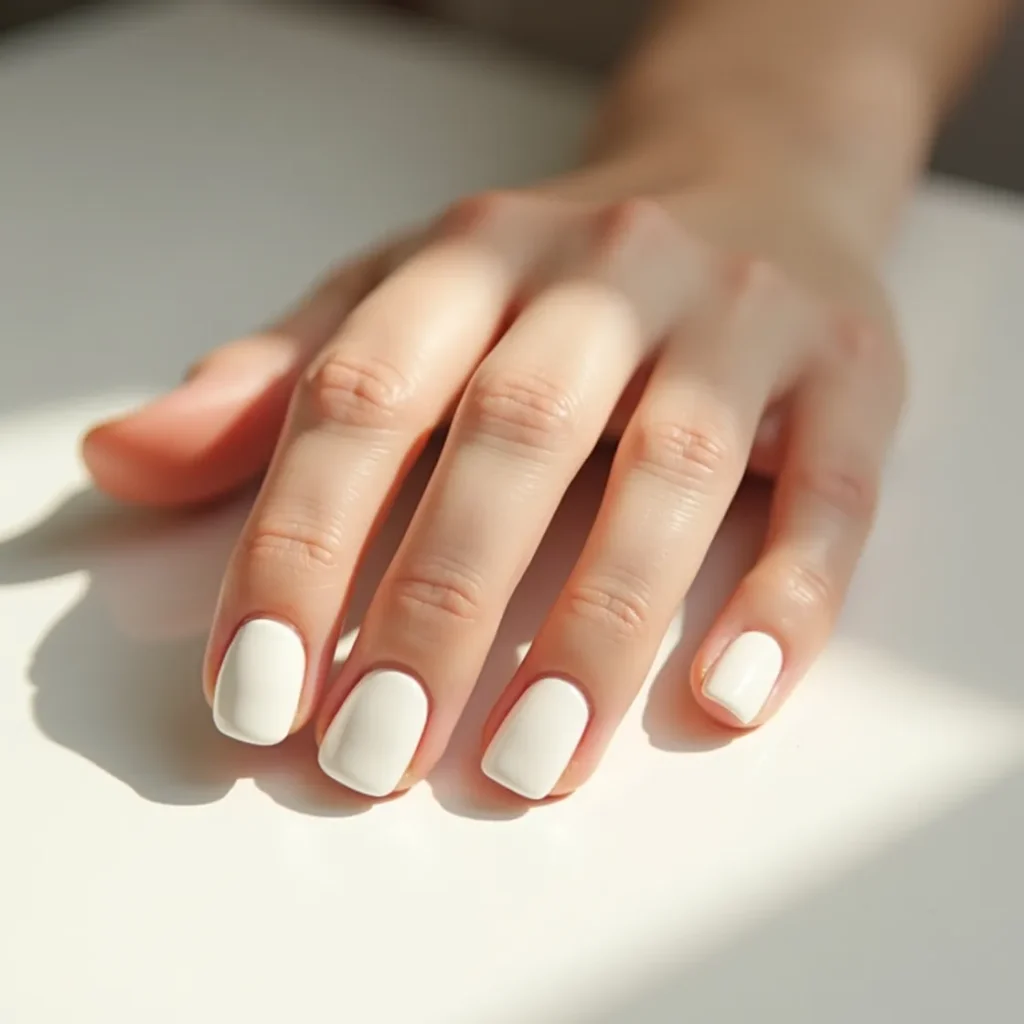
A milky white — sheer, slightly warm, not stark — in a glazed finish. The most versatile Easter fingernail design in this list: it works for Easter brunch, the office the following week, and every spring occasion through June. The glazed quality adds more interest than a standard opaque white. Easy to execute, very hard to wear wrong.
DIY tip: Use a milky or sheer white polish (look for ones described as “cloud” or “soap” finish). Two to three coats for opacity, then glossy topcoat. The milky quality comes from the polish formula, not the application.
Speckled & Textured Designs
6. Speckled Egg Nails
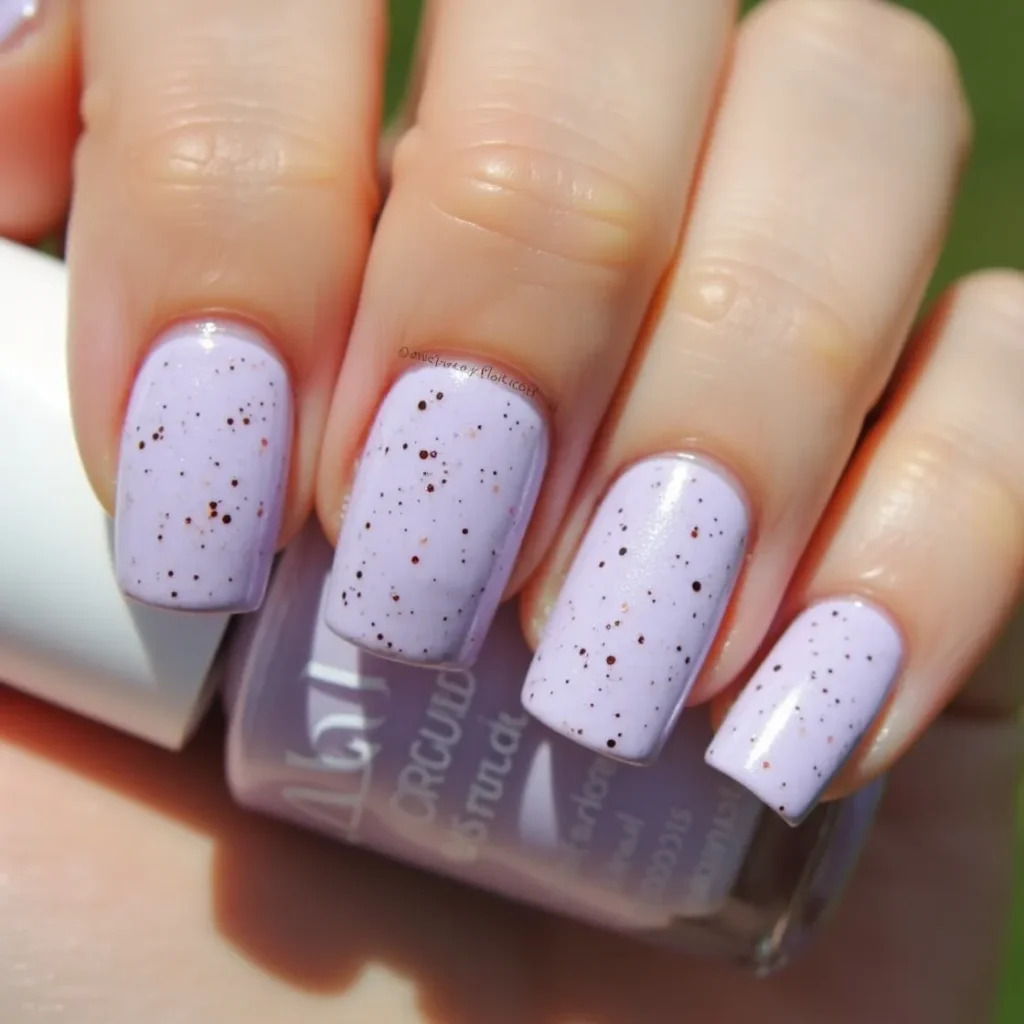
The Easter design with the strongest performance across both Pinterest and Google right now. Soft pastel bases — lavender, powder blue, cream, mint — with fine speckles that reference robin eggs or quail eggs without being cartoonish about it. The subtlety is what makes these work. They read as Easter imagery to anyone paying attention, and as interesting texture to anyone who isn’t.
DIY tip: Paint your preferred pastel base and let it dry fully. Dip a dry fan brush or clean mascara wand into a contrasting dark brown or black, then flick the bristles toward the nail from about 15cm away. Practice the flick motion on paper first. Seal with topcoat.
7. Pastel Aura Nails
Aura nails — a soft, blended color cloud centered on the nail with a lighter or darker edge — are one of the standout nail art techniques of 2026. In Easter colors (lavender-to-white, peach-to-blush, mint-to-clear) they create a dreamy, almost atmospheric effect that reads as genuinely modern rather than trend-chasing. The smudged gradient quality photographs exceptionally well.
DIY tip: Apply a sheer or milky base. While still slightly tacky, sponge or stipple your chosen color into the center of each nail, then blend the edges outward. The goal is a soft cloud, not a clean gradient. Seal with glossy topcoat.
8. Cracked Easter Egg Negative Space Nails
A more editorial take on Easter imagery: pastel color on most of the nail with a thin line or irregular patch of bare nail at the tip suggesting a cracked egg shell. The negative space detail does the seasonal storytelling without any actual nail art skill. On shorter nails the crack motif looks particularly deliberate and clean.
DIY tip: Apply pastel polish leaving a thin sliver of the nail tip unpainted, or use tape to mask an irregular edge. The “crack” can be as thin or as irregular as you like — thinner reads more refined.
Floral Easter Fingernail Designs
9. Daisy Accent Nail
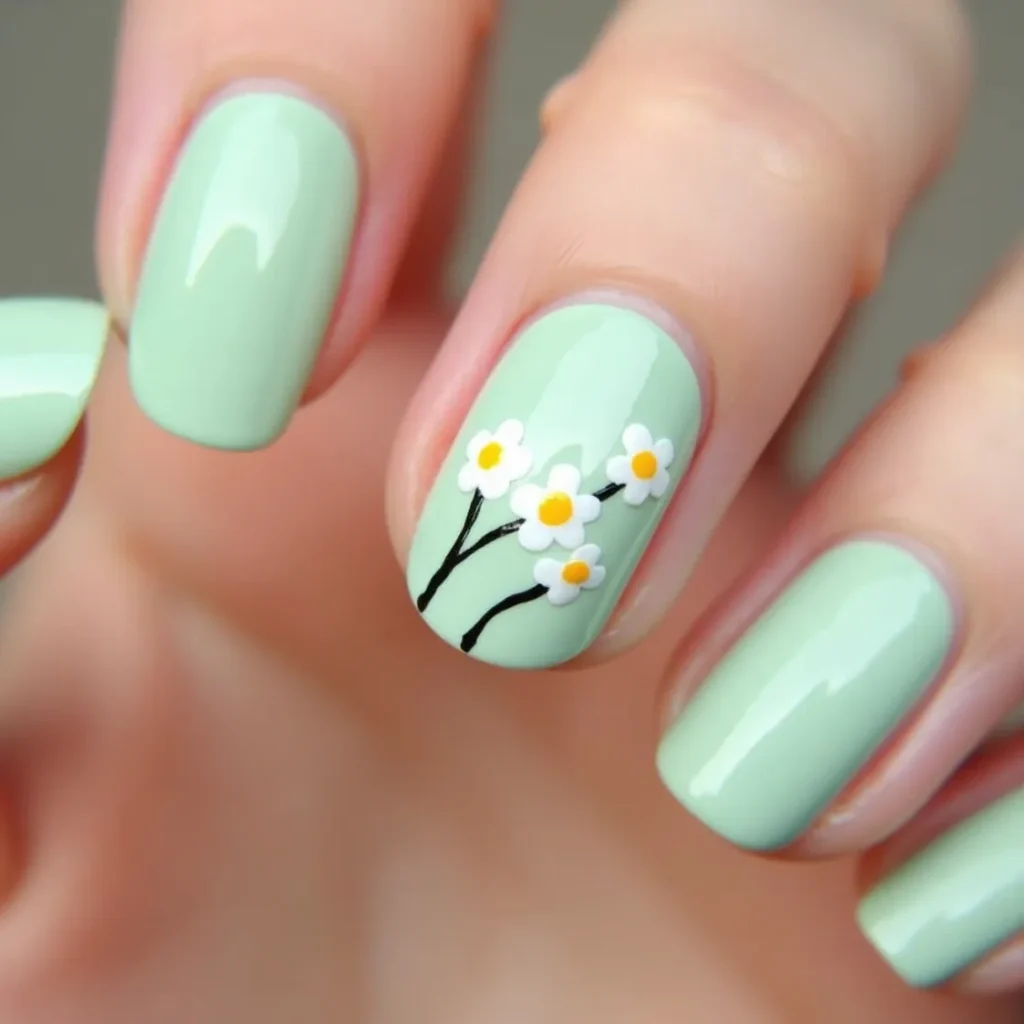
White daisies with butter yellow centers on one accent nail against a plain pastel base. The accent approach is better than a full floral set on most nail lengths — it gives the art room to breathe, keeps the proportions balanced, and makes the design easier to live with for a full week. The daisies should be small enough that the base color still does most of the visual work.
DIY tip: Paint your base color on all nails. On the accent nail, use a dotting tool to place five small white petal dots in a circle, then add a single yellow dot in the center. Two or three daisies per nail is enough.
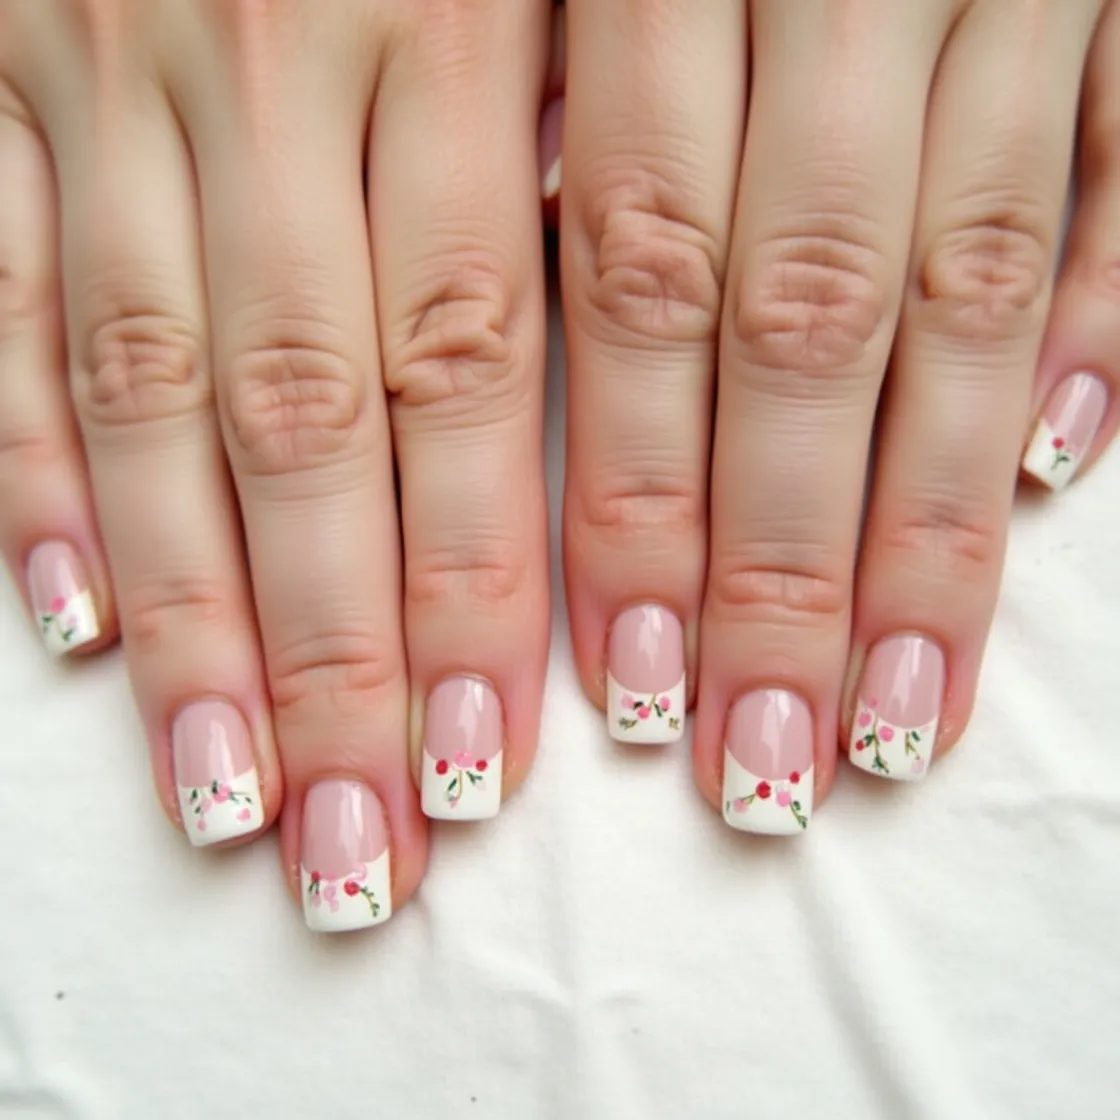
10. Floral French Tips
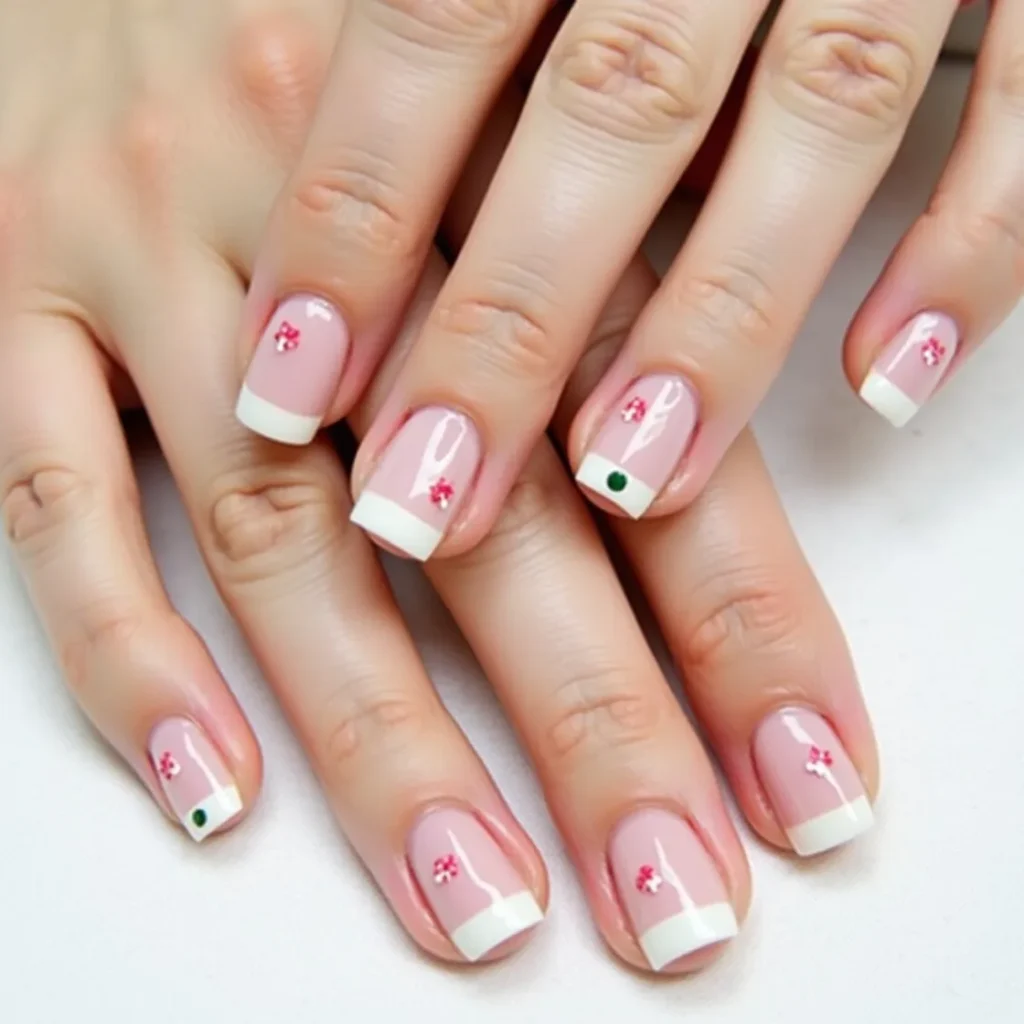
A French tip with small flowers painted along the tip line — cherry blossoms or daisies scattered where the white line normally sits. More interesting than a standard French tip and more wearable than a full floral set. The tip placement keeps the nail feeling clean while the flowers provide enough seasonal detail to read as an actual Easter fingernail design.
DIY tip: Apply a sheer base and let it cure. Along the tip, use a fine liner brush to paint small clustered flowers — three to five petals each in white or soft pink. Add small yellow center dots. Seal with glossy topcoat.
11. Cherry Blossom Full Set

Delicate pink cherry blossoms scattered across all five nails on a sheer white or cream base. Unlike heavier floral designs, cherry blossom nail art is about negative space as much as the flowers themselves — sparse petals on a pale background feel more like a Japanese woodblock print than a decorated Easter egg. Strong on longer nail shapes where the petals have room to breathe.
DIY tip: Start with a sheer or milky base. Using a small dotting tool, create five-petal clusters by placing oval dots in a fan pattern. Add a tiny center dot in yellow. The flowers look better slightly imperfect than perfectly symmetrical.
12. Wallpaper Floral Nails
A vintage-inspired design: a faded, slightly muted base (dusty blue, soft sage, pale rose) with hand-painted flowers in a pattern that references old wallpaper or fabric prints. The dated quality is intentional and very much in step with 2026’s broader return to romantic, historical aesthetics in beauty. More ambitious to execute than other designs in this list, but one of the most distinctive Easter fingernail designs available.
DIY tip: Apply a slightly chalky, muted base. Using a small brush, paint loose informal flowers — not botanically precise, just gestural clusters of petals and leaves in complementary colors. The less polished the better.
French Tip Variations
13. Pastel Rainbow French Tips
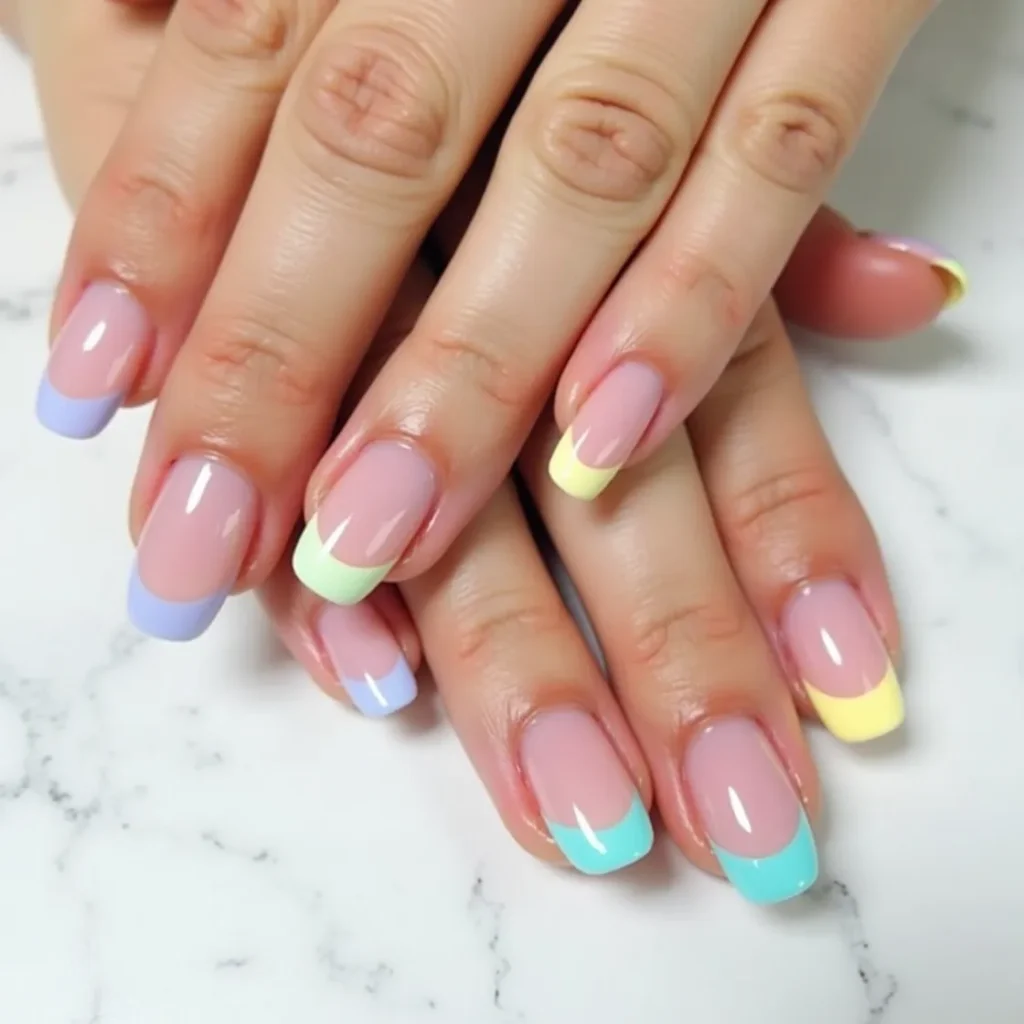
Each nail gets a different pastel tip — lavender, mint, yellow, peach, blue — over a sheer milky base. This combines two of spring’s strongest nail trends (French tips and pastel Skittles sets) into something more refined than either alone. The sheer base keeps the look from reading as maximalist; the tip color provides the seasonal detail.
DIY tip: Apply a sheer milky base. Use tape or a French tip guide to mask each nail in turn, then paint each tip in a different pastel. Remove the tape while the polish is still slightly wet for the cleanest edge.
14. Mint Green French Tips
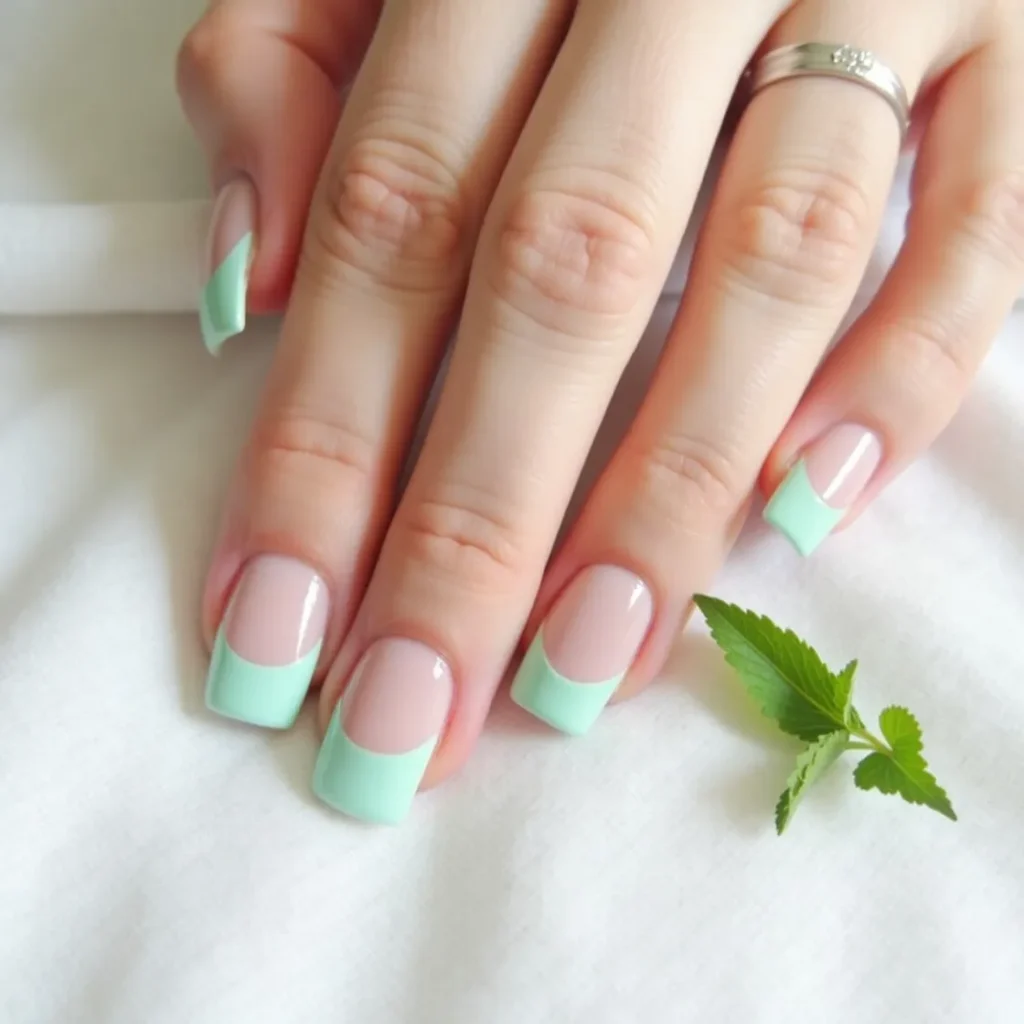
Crisp mint French tips on a sheer white base. The color contrast is sharper than a traditional French tip and more spring-relevant without needing any additional art. The square edge version suits the geometry of the tip line particularly well. Clean, unambiguous, and easy to wear across multiple occasions.
DIY tip: Standard French tip application with mint green polish instead of white. Tape guide or stencils work well. A clean topcoat seals and brightens the mint.
15. Angular Apex French Tips
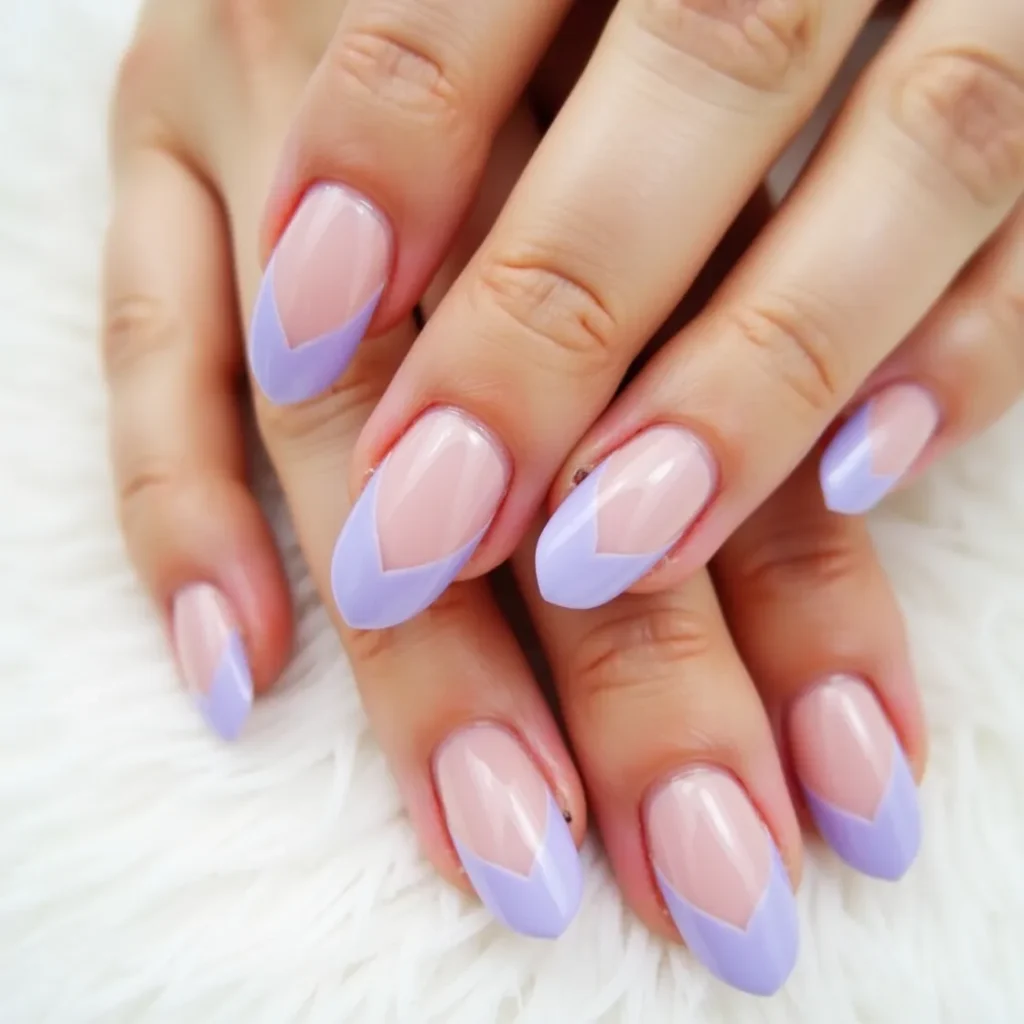
A modern update to the French tip: instead of a rounded smile line, the tip comes to a soft angular point or V-shape at the center. In pastel colors this reads as architectural rather than harsh — a fresh alternative to the classic curve that’s particularly strong on coffin and almond shapes.
DIY tip: Use tape in a V-shape across the nail to guide the angular tip line. Apply pastel polish, remove tape while wet, clean edges with a fine brush dipped in acetone.
Easter Nail Art & Motifs
16. Minimal Bunny Silhouette
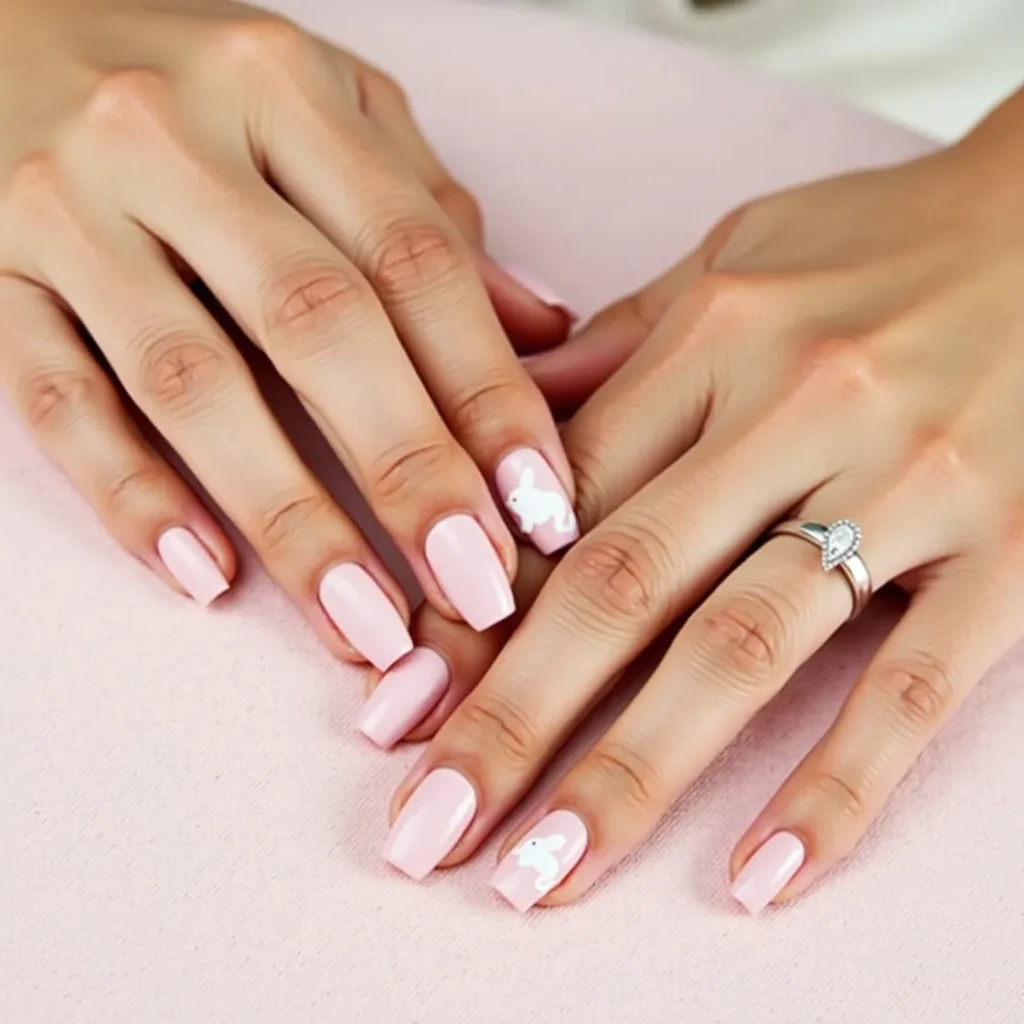
A small, simple bunny silhouette — just the ears and top of the head — on one or two accent nails over a pastel base. The minimal version works because it’s a suggestion rather than an illustration. A clean white or gray silhouette at the base or tip of the nail reads as Easter without requiring detailed nail art skill. The key is keeping it small enough that it reads as an accent rather than the whole design.
DIY tip: On a plain pastel nail, use a thin liner brush and white polish to draw two elongated ovals (ears) rising from a small circle (head) near the base of the nail. The simpler the shape, the better it reads.
17. Pastel Skittles Set
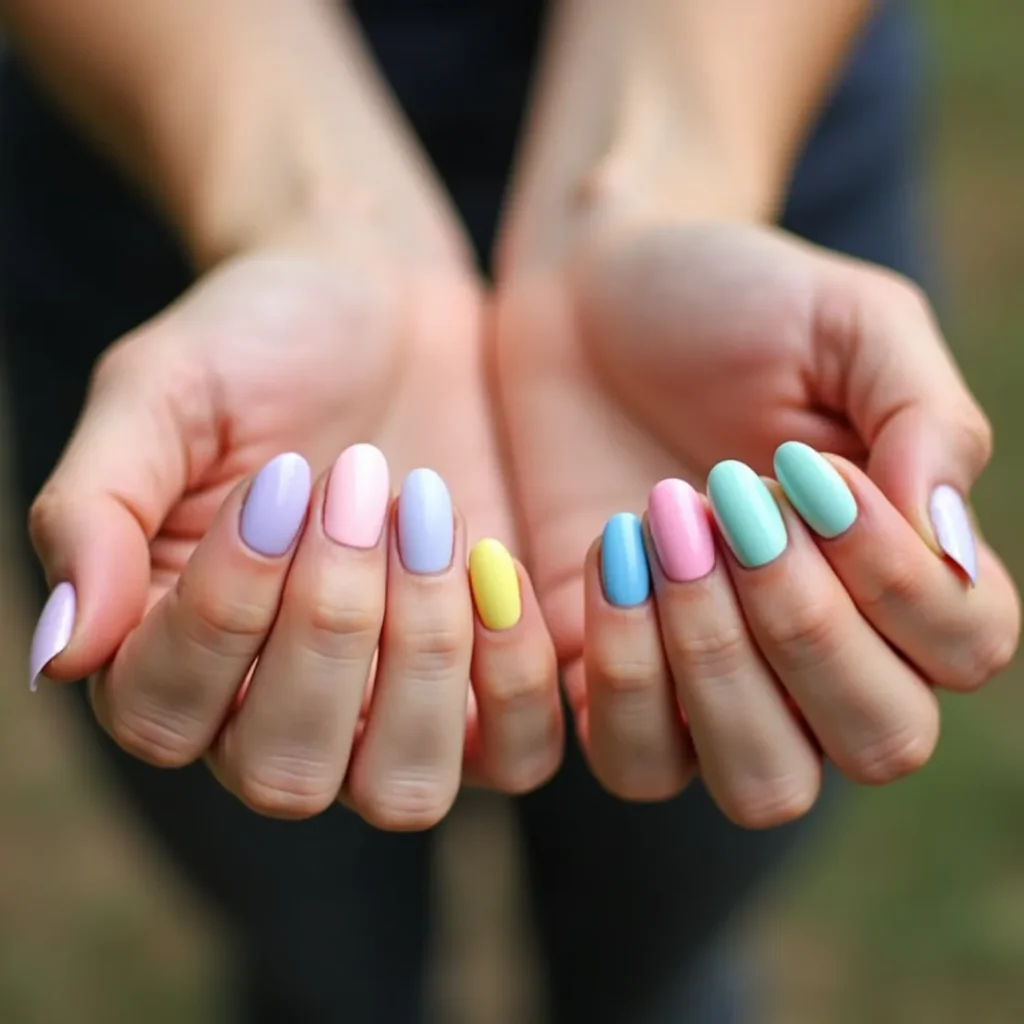
One color per finger — lavender, mint, butter yellow, baby pink, sky blue — across all nails. No art, no gradients, just five harmonious spring tones. The strength of this design is in the color selection: the shades need to be close enough in warmth and saturation to feel like a curated set rather than five random polishes. In a glazed or glossy finish, the set photographs as a unified whole.
DIY tip: No special technique needed. The only requirement is choosing shades from the same tonal family — all warm or all cool, all muted or all bright. Mixing warm yellows with cool blues creates dissonance.
18. Easter Egg Marble Nails
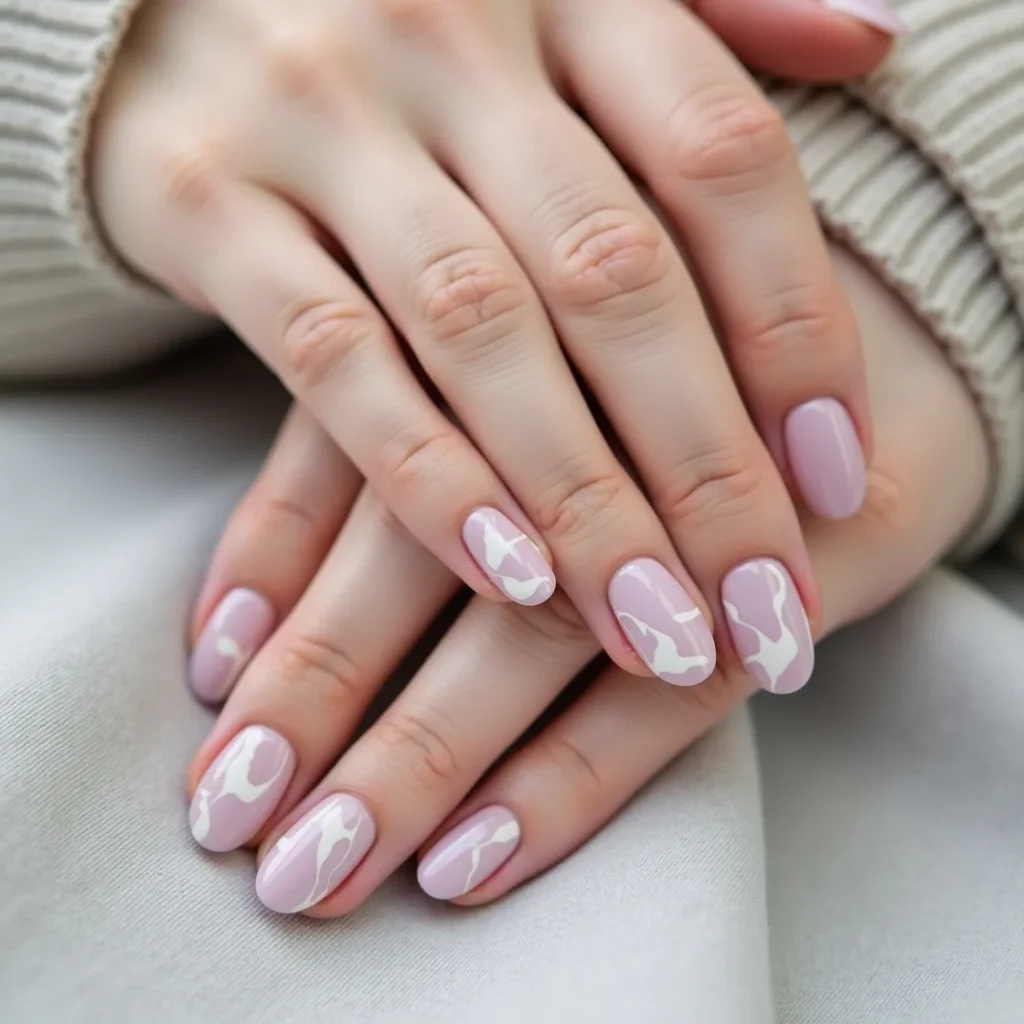
Marbled nail art in Easter colors — lavender and white, blue and cream, pink and gold — creates an effect that looks like decorated Easter eggs without the literal iconography. The organic marble pattern is more interesting up close than from a distance, which makes it particularly good for Easter table settings where people are looking at your hands throughout a meal.
DIY tip: Apply a pastel base. While wet, drag a thin brush loaded with a slightly darker or contrasting color in loose S-curves across the nail. Blend slightly with a clean brush dipped in acetone. Seal immediately with topcoat before the marble effect dries.
19. 3D Flower Embellishments
Small resin or acrylic flower embellishments on one or two accent nails over a plain pastel base. The 3D element catches light differently from any painted design and creates genuine texture. On fingernails, keep the flowers small — one or two per nail rather than a cluster — so the effect reads as an accent rather than an addition.
DIY tip: Apply gel base, cure, then press small resin flowers into uncured gel topcoat. Cure under UV to lock them in place. Apply one more seal coat over the flowers.
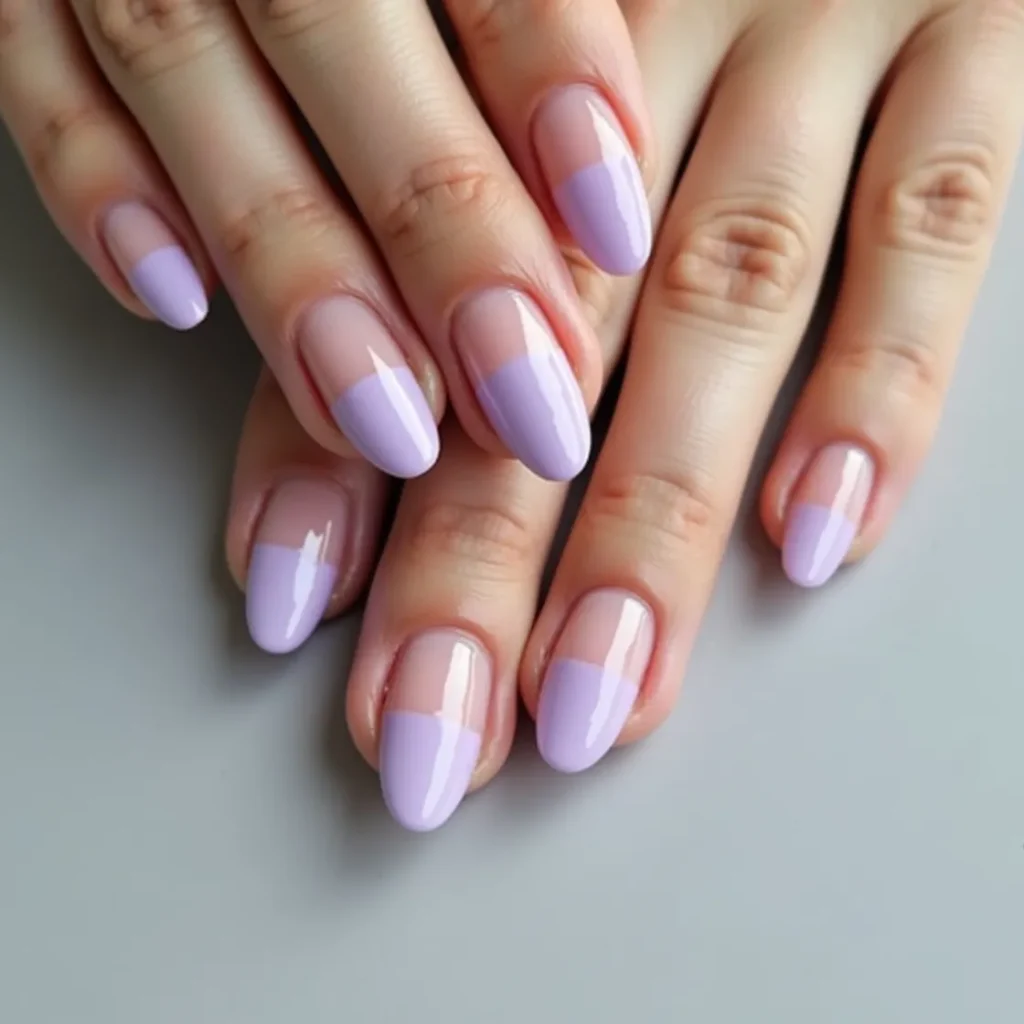
20. Half-Moon Cutout Nails
A reverse or half-moon design — the lunula (the crescent at the nail base) left bare or painted in a contrasting pastel while the rest of the nail is a solid color. The negative space quality makes this feel more editorial than standard Easter designs. Strong on shorter nail lengths where the lunula is more prominent. Works especially well in a two-pastel combination: butter yellow body with a baby blue moon, or mint with a soft lavender.
DIY tip: Apply base color to the whole nail. Once dry, use a reinforcement sticker (the circular ones for hole-punched paper) centered over the lunula, apply your second color over the exposed area, remove sticker while wet, clean edges, topcoat.
Simple & Everyday Easter Designs
21. Single-Color Pastel, Perfectly Applied
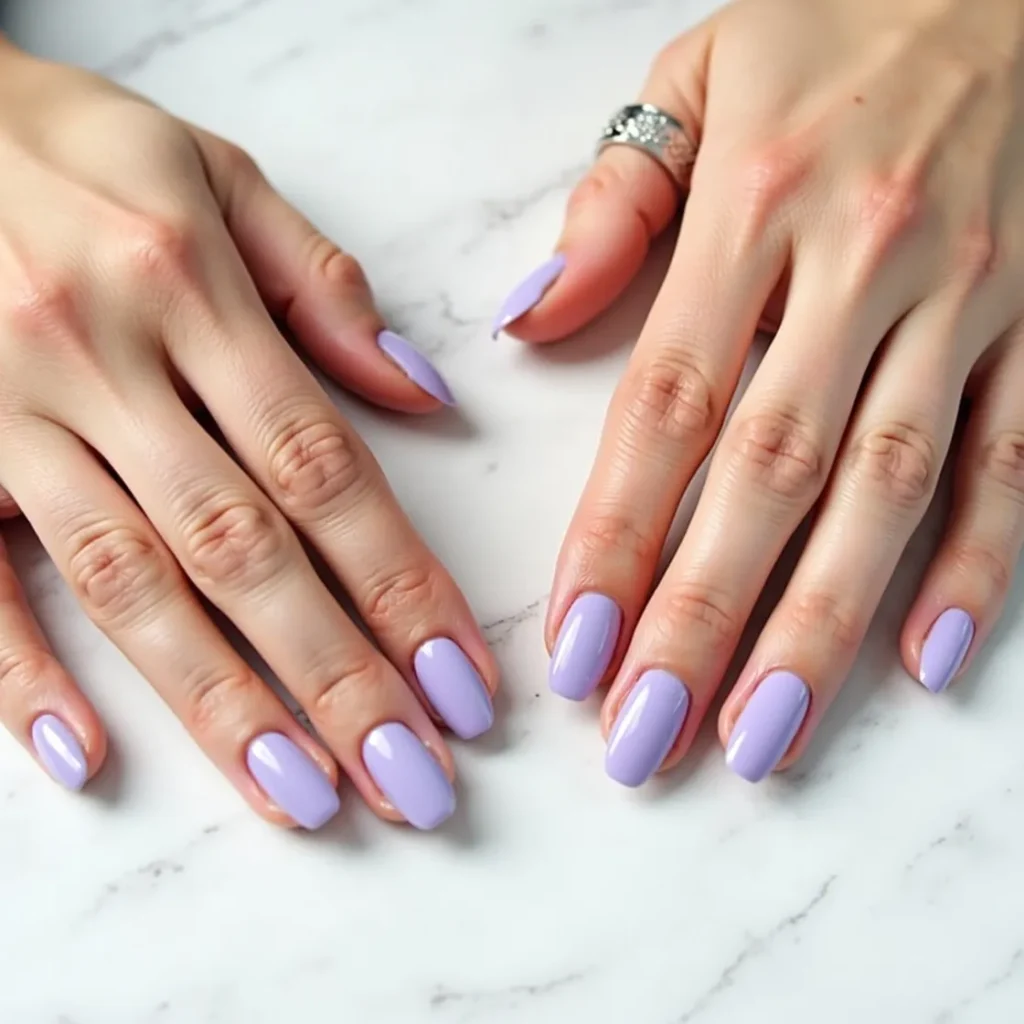
One coat — or two, applied well — of soft pastel pink, lavender, or mint. No gradients, no art, no accents. The argument for the simple version is that a perfectly applied single color on clean, shaped nails looks better than any complicated design that’s slightly off. Easter fingernail designs don’t require nail art. They require good color and clean application.
DIY tip: Shape and buff nails. Apply a thin base coat. Two thin coats of your chosen pastel, letting each dry fully. Glossy topcoat. The effort goes into prep, not embellishment.
22. Pastel Ombré
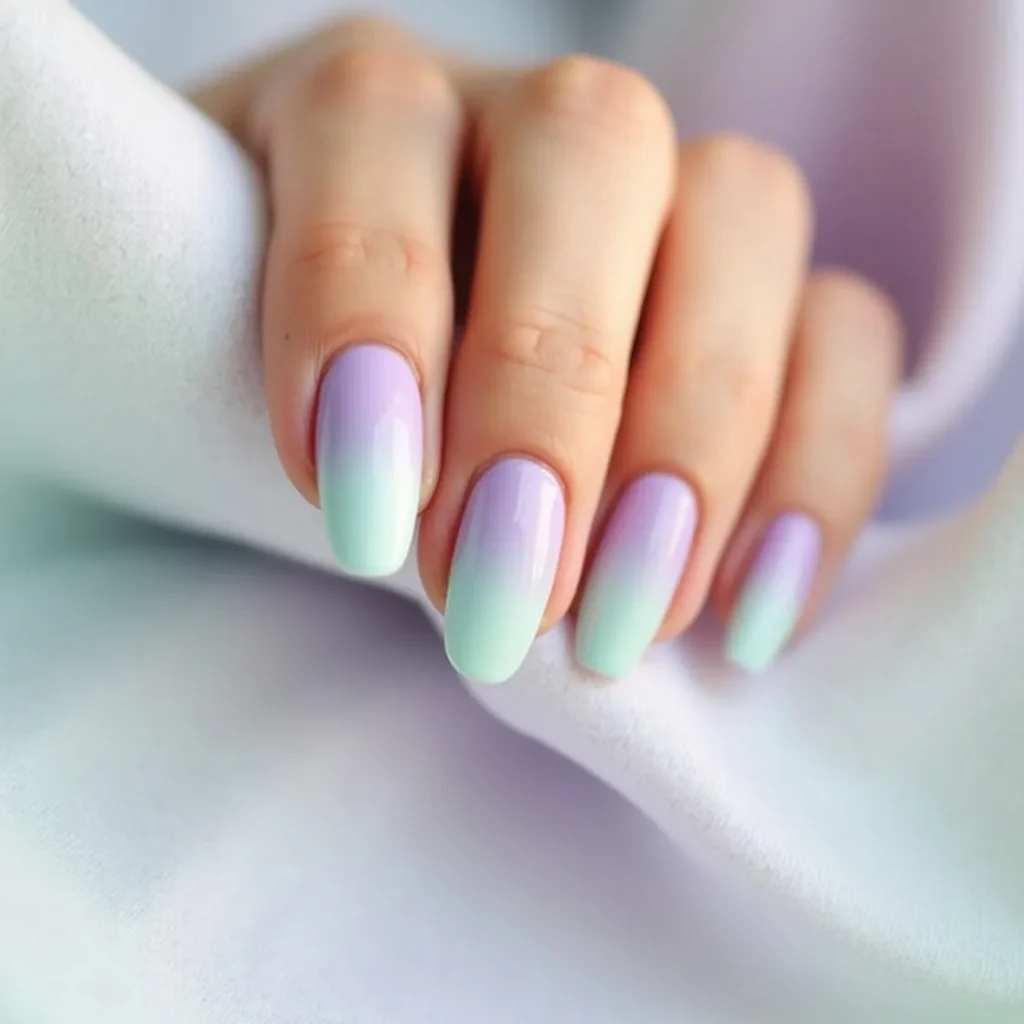
A smooth gradient from one pastel to another — lavender to mint, peach to blush, butter yellow to cream — on medium length nails. The ombré works because it’s doing the same thing as a Skittles set (showing the full Easter palette) while keeping each nail unified. In a glossy finish the blended midpoint catches light in a way that makes the nails look dimensional without any art.
DIY tip: Apply the lighter shade as a base. Sponge the darker shade onto a makeup sponge, then dab it onto the top third of each nail. Blend the edge by stippling rather than dragging. Multiple thin layers build better gradient than one thick one.
23. Pastel Blue and White Stripe

Thin white stripes over a powder blue or robin’s egg blue base. The stripe pattern references Easter egg decoration in the most oblique way — it’s the suggestion of a decorated egg, not the illustration of one. Vertical stripes elongate the nail; diagonal stripes add movement. On shorter nails, fewer thicker stripes read better than many thin ones.
DIY tip: Apply the blue base and let it cure fully. Use striping tape to mask thin lines, apply white polish over the exposed areas, remove tape while wet. Alternatively, use a thin liner brush freehand.
24. Lavender with Gold Accent Nail
Matte lavender on four fingers, single gold foil or gold chrome accent on one. The matte-versus-reflective contrast does all the visual work; no additional design is needed. The gold reads as celebratory without being garish, and the matte lavender grounds it. One of the most consistently photographed Easter fingernail designs across Pinterest boards this spring.
DIY tip: Apply matte lavender to four nails using a matte topcoat. On the accent nail, apply gold chrome powder over a gel base, or press gold foil onto a slightly tacky gel topcoat. Seal with gel topcoat.
25. Pastel French Tip with Tiny Star or Dot Detail
A pastel French tip with a single small detail at the inner corner of the tip line — a tiny star, a dot, or a small cross. The detail is almost invisible at normal distance but adds craftsmanship up close. This is the design for people who want something to discover on their nails rather than something to announce. Clean, modern, and works across every nail shape.
DIY tip: Apply a standard French tip in any pastel. Once dry, use a dotting tool to add a single small dot or short cross at the corner where the tip line meets the nail edge. White or gold reads best.
Quick Answers: Easter Fingernail Designs 2026
These questions pull directly from Google’s ‘People Also Ask’ results for this keyword. Answering them here helps the page earn featured snippet placement.
What are the most popular Easter fingernail designs for 2026?
The strongest designs this season are glazed pastels (lavender, peach, butter yellow), speckled egg nails in soft bases, floral French tips, pastel chrome finishes, and aura-effect nails. The unifying thread is that all of them feel spring-appropriate without leaning into obvious Easter iconography. Bunnies and eggs are still present, but as subtle accents rather than the whole design.
What nail colors are best for Easter fingernail designs?
Powder blue, soft lavender, butter yellow, mint green, baby pink, and barely-there peach are the season’s strongest Easter colors. For 2026 specifically, glazed and sheer finishes are outperforming opaque ones — the translucency adds depth and makes solid colors look more interesting. Robin’s egg blue is also having a strong moment as an alternative to the usual lavender-and-pink defaults.
What Easter fingernail designs can I do at home?
The easiest designs to DIY are: speckled egg nails (apply a pastel base, then flick thin paint over it with a dry brush), pastel skittles sets (one color per nail, no art required), micro French tips with a thin brush or tape guide, and glazed single-color nails using a regular polish with a glossy topcoat. Daisy nail art with a dotting tool is also very achievable — petals are just five small ovals around a yellow center dot.
How long before Easter should I get my nails done?
Two to three days before Easter is ideal for gel manicures — enough time to let any minor settling happen before the main event, and fresh enough that the color is still at peak vibrancy. For regular polish, the day before or the morning of works fine. Avoid getting gel nails done on Easter morning itself; newly set gel under UV lamps can be slightly sensitive to heat.
A Note on Choosing Your Easter Fingernail Design
The best Easter fingernail design is the one you’ll actually wear confidently for two weeks after Easter Sunday. Seasonal designs that feel overcrowded or high-maintenance have a way of being picked off by day three.
For most people, that means choosing either a color-forward design (glazed pastels, chrome sheers, aura effects) or a single subtle art element (one daisy accent nail, speckled egg texture, a minimal French tip variation) rather than both at once. The restraint is what makes designs look intentional rather than assembled.
Every design in this list was selected because it holds up under both conditions: looks good in the photo, looks better in person.